(F un Fact: Stephen likes the taste of dirt.)
Our health is directly affected by the health of our soil. In order for us to get the essential micro nutrients we need to stay healthy, we have to eat plants that contain them. In order for plants to contain them, they have to absorb them from the soil.
Much of the Earth’s soil has been damaged or “ruined” by us. Although we may not be able to “fix” all of the soil on the planet by ourselves, we can improve the soil in our own back yard.
What is Loam Anyway?
Before we work on getting you some amazing garden soil, let’s talk about what amazing garden soil looks like and why is it referred to as loam?
In general, amazing garden soil should…
- Be crumbly and full (loamy) rather than gritty (sandy), smooth (silty) or slippery/sticky (clay)
- Be fluffy or airy, so air can penetrate it
- Have a pleasant earthy odor or very little odor at all
- Appear rich dark brown or black in color
- Have a garden soil pH conducive to plant growth, usually between 6 and 7
- Be teaming with life, worms, bacteria and fungi
- Be well drained, or allow water to pass through it.
Soil Composition
Soil is primarily composed of organic matter, rock particles, water, air and soil dwelling critters. In general the more organic matter the better. Organic matter is sometimes referred to as Humus. Although this common term is a misnomer, because technically humus is organic matter that can no longer be broken down.
Organic Matter: All soil types benefit from organic matter. Organic matter such as leaf waste, peat moss, manure, kitchen scraps and compost feeds the soil dwelling critters, aerates the soil, increases nutrient levels, helps the soil retain moisture, while at the same time helping it drain properly. Soil usually only contains about 5 to 10% organic material, and it is continuously being broken down and eaten by soil organisms, so you need to continually add it to your soil to keep it healthy.
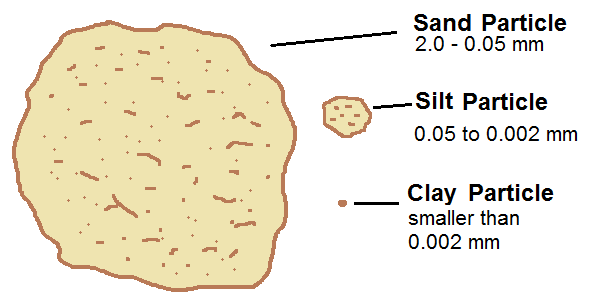
Rock Particles: The rock particles are generally known as Sand, Silt and Clay depending on their size. As you can see in the diagram below, sand is the largest at 2 to .05 mm in diameter, silt is medium at .05 mm to .002 mm, and clay is anything smaller than .002 mm. The diagram below will give you an idea.
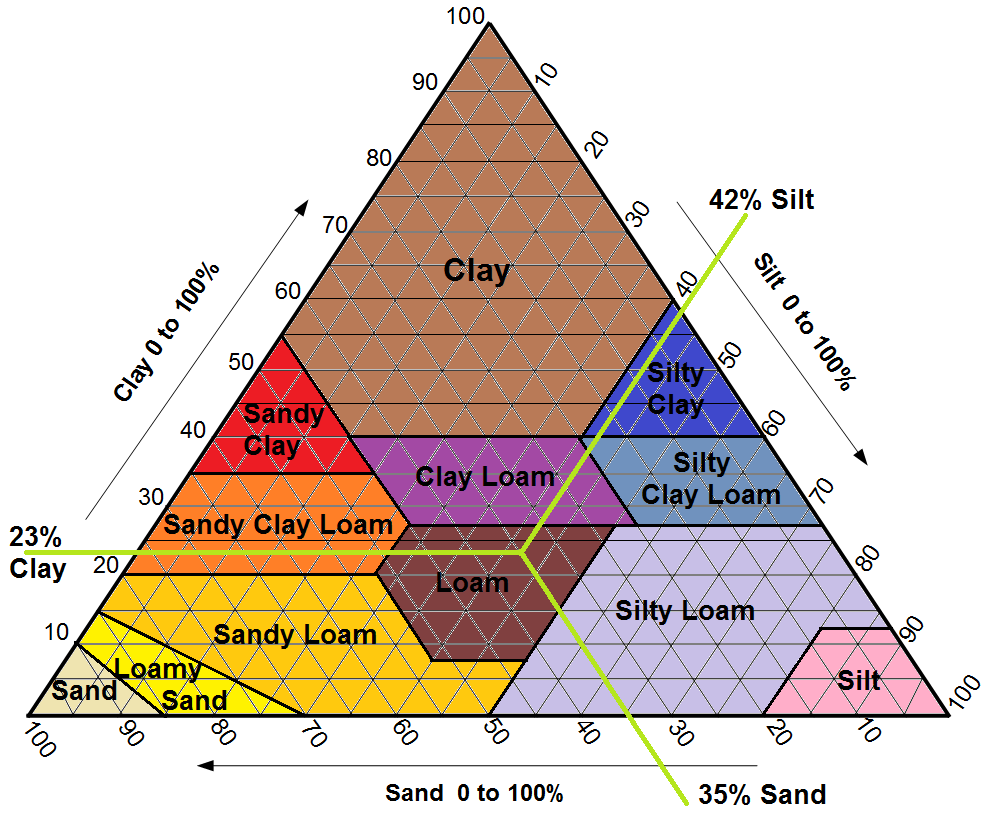
In order for a soil to be loamy it has to have it must have between 0 and 40% clay, 20 to 60% sand, and 40 to 70% silt. See the chart and descriptions below. Notice the large variety of loamy soil types, none of which is “perfect”, but each good for growing different kinds of plants.
Air: Healthy soil is “fluffy” and contains about 25% air. The soil critters depend on oxygen for survival, and the plants need the nitrogen from the air. If you have too much silt or clay, you’ll have poor aeration. Also, walking or driving on your soil will compact it and remove the air space.
If you have too much sand, you’ll have too much air. If you have too much air, your soil will dry out quicker, also the soil dwelling critters break down the organic material in the soil too quickly, which steals nitrogen from your plants.
Water: Healthy soil should retain moisture like a sponge. Water will wrap itself around each of the particles in your soil. This should make up about 25% of your soil. If your particles are to large like in sandy soils, the water will drain out quickly and the large spaces between the particles will cause the water to evaporate quickly.
If your particles are too small, like in clay, the particles will lock together and prevent water from passing. This will either cause the water to run off or not drain properly. If your water doesn’t drain and your soil gets water logged, your plant roots and the soil dwelling critters will drown.
You want the spaces between your particles to be just the right size so that water can slowly penetrate, surround your soil particles, and let the excess drain. In addition, deep water will creep upwards through capillary action in healthy soil, allowing the shallow soil to stay moist longer.
Soil Dwelling Critters: Healthy soil has a food web of microbiology feeding off of the organic matter in the soil and off each other. These critters live in the top 6 inches of your soil and consist of bacteria, fungi, earthworms, and more. Later, I’ll go over each critter in detail, but for now you just need to know that the soil life is critical to the health of your plants.
Plants depend on the soil dwelling critters for their nutrient needs. Plants don’t absorb the minerals they need from the rock particles. They get them from the soil dwelling critters’ waste. Plants actually release food for these critters through their roots, to attract the critter and the waste that it needs.
How Do You Make Your Garden Soil Great?
Now that you know what healthy soil looks like and what it’s made of, you can start building great soil. The first step is to determine what kind of soil you have. Then you can choose the proper inputs you need to improve your soil.
First go here and find out what the Webb Soil Survey says about your soil. That will give you a good idea, then you should test it.
The Mason Jar or Composition Test
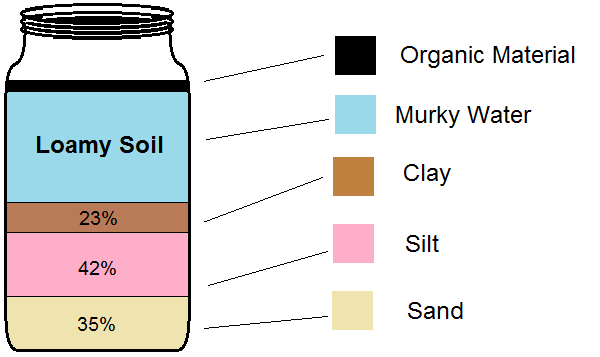
This test will help you determine how much sand, silt, clay and organic material is in your soil. Once we know this, we can adjust it accordingly.
- Start with an empty mason jar with smooth sides, and fill it about half way with your garden soil.
- Fill the jar with water, and let the all of the air escape from the soil.
- Leave about ½ inch of air in the top and put the lid on.
- Shake it up vigorously until all clumps are broken up.
- Set it in a window sill watch for 5 minutes. The sand will settle out. Mark the jar with a wet erase marker at the top of the sand.
- Go watch a movie. When the movie is over, the silt particles should have settled out. Mark the jar again.
- Don’t disturb the jar, and come back 24 hours later. The clay should be settled out by now. Mark the jar again.
Analyzing Results
- More than 75% sand, less than 15% silt and less than 10% clay = sandy soil
- More than 40% clay, less than 40% silt and less than 45% sand = clay soil
- More than 70% silt, less than 10% clay and less than 15% sand = silty soil
- Anything else is considered loam, which is preferred.
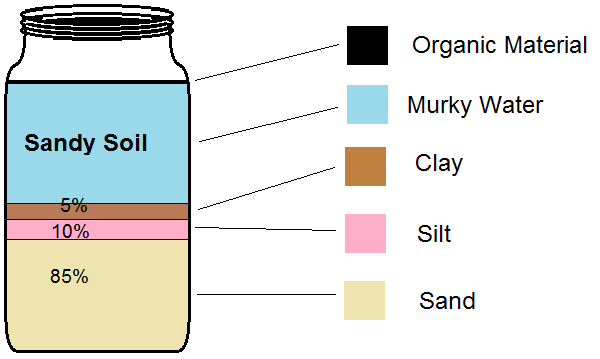
Sandy Soil: will be great for drainage and aeration, but you will find that it won’t hold moisture well. Its large particles allow the water to drain too quickly. You may find that the water washes away nutrients. Watering this type of soil slowly will be important.
Also, since it is so well aerated, you’ll probably see that the microbes are eating the organic material quickly. This could steal nitrogen from your plants. You’ll also have to add more organic matter than “normal” on a yearly basis to compensate for this.
Improve Sandy Soil by tilling in…
- 1 inch of Vermiculite – a clay like mineral that will help with water retention
- 2 inches of Cocopeat – fiber from coconuts that helps with water retention (you can use Peat Moss, but it is highly acidic so you don’t want to use it if your soil is already acidic. More on this later. Peat Moss is also mined and not sustainable)
- 4 inches of compost, composted manure, or composted leaf debris for nutrients, and water retention.
Upkeep Sandy Soil by…
- Mulching around your plants with shredded leaves or compost. Mulch will help retain moisture, protects and cools the soil.
- Adding at least 2 inches of shredded leaf mulch each year in the fall and again in the spring after planting.
- I don’t suggest that you till again, but if you want to till in the spring, you can overwinter your bed by growing a cold-hardy cover crop like vetch or winter rye. Then in the spring till them in before you plant your garden. This is referred to as green manure.
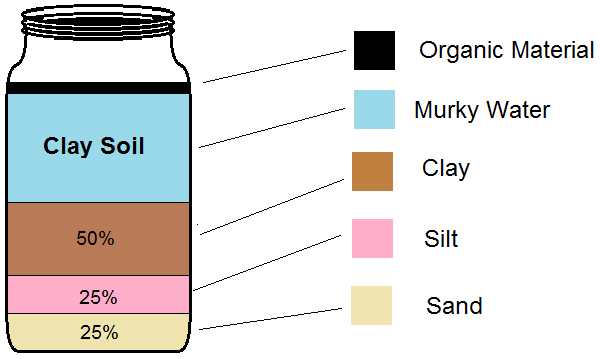
Clay Soil: Is opposite of sandy soil. Its particles are too small. This prevents proper aeration and drainage. The lack of air usually means that the soil is deficient in organic matter and micro-organisms. It also compacts easily and is hard to work with wet or dry. However, it does hold moisture and is usually rich in nutrients.
Improve Clay Soil by tilling in…
- 1 inch of Cocopeat. This will break up the clay particles, lighten and aerate the soil.
- 4 inches of Perlite. A light weight mineral that will help with aeration and drainage.
- 6 inches of compost, composted manure, or composted leaf debris for nutrients, and water retention.
- If applicable, sprinkle on Gypsum at 4lb per 1000 sqft of garden. Gypsum is a mineral that will chemically gather clay particles into larger balls. This will help with aeration and drainage. However, this only works with soils with low Calcium and Sodium levels. In other words soils with a limestone parent will not work, like in the Southwest, but soils with a granite parent will, like in the East, should work. You only need to add Gypsum once, it can take up to 3 years to activate to its fullest extent.
Up-Keeping Clay Soil:
- Mulching around your plants with shredded leaves, or compost. Mulch will help keep the surface from drying out and crusting up.
- Adding at least 2 inches of shredded leaf mulch each year in the fall and again in the spring after planting.
- Do not walk on the soil or compact it in any way. Mark off the area or…
- Use raised beds. Raised beds will also improve drainage.
- Do not till again unless you are want to add more Cocopeat and Perlite.
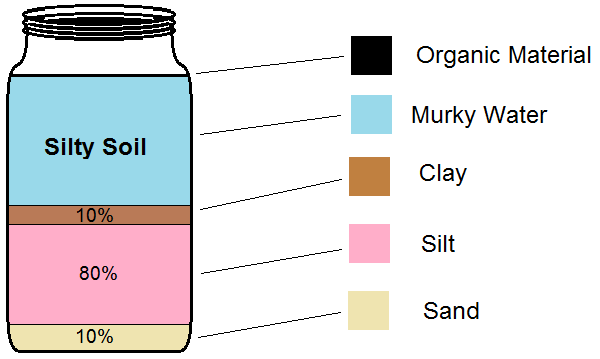
Silty Soil: is a step up from clay, but is also has problems with aeration, compaction and drainage. However, it is usually more fertile than sandy or clay soils.
Improve Silty Soil by tilling in…
- 1 inch of Cocopeat. This will break up the clay particles, lighten and aerate the soil.
- 2 inches of Perlite. A light weight mineral that will help with aeration and drainage.
- 4 inches of compost, composted manure, or composted leaf debris for nutrients, and water retention.
Up-Keeping Silty Soil:
- Mulching around your plants with shredded leaves, or compost. Mulch will help keep the surface from drying out and crusting up.
- Adding at least 2 inches of shredded leaf mulch each year in the fall and again in the spring after planting.
- Do not walk on the soil or compact it in any way. Mark off the area or…
- Use raised beds. Raised beds will also improve drainage.
- Do not till again unless you are want to add more Cocopeat and Perlite.
Bailing Wire or Compaction Test
This test will help you determine how compacted our soil is.
- Straighten out a 2 foot section of 9 or 10 gauge bailing wire or find a landscaping flag or metal clothes hanger. You can also use a 1/8th inch dowel.
- Hold it vertically over your un-tilled garden bed.
- Gently but firmly push it into the soil until the wire stops, buckles or bends
- Measure how far you were able to push it in
Analyzing Results
- The further you could go the better. If it was easy to push in, then it will be easy for your plants’ roots to grow.
- If it was easy, then this is also a good indecation of good aeration and drainage.
- If it was hard to push, or you weren’t able to push it more than a few inches, then your soil is either compacted, heavy with clay, or both.
Improve Compacted Soil by…
- Tilling in 1 inch of Cocopeat, 4 inches of Perlite and 6 inches of compost like we did with your heavy clay soil above.
- Mulching around your plants with shredded leaves or compost. Mulch will encourage worms to come up to the surface and aerate the soil.
- Adding at least 2 inches of shredded leaf mulch each year in the fall and again in the spring after planting.
- Not walking on the soil or compacting it in any way. Mark off the area or…
- Use raised beds. Raised beds will also improve drainage.
- Do not till again unless you are want to add more Cocopeat and Perlite.
Drainage Test
This test will help you see how well your soil drains.
- Dig a small hole about 12 inches around and 12 inches deep.
- Fill the hole with water and let it drain completely
- Then fill it again and note the time
- Check on the hole every 30 mins to an hour and note how long it takes the second batch of water to drain.
Analyzing Results
- Less than 2 hours – Your soil drains too fast. You need to treat it like sandy soil above, tilling in 1 inch of vermiculite, 2 inches of cocopeat and 4 inches of compost. Water more often and consider drought tolerant plants. You may also consider using a wicking bed instead.
- 2 to 6 hours – You have good drainage.
- 6 hours or more – Your soil drains too slowly. You need to treat it like the clay soil above, tilling in 1 inch of Cocopeat, 4 inches of Perlite and 6 inches of compost. Also, consider adding some Gypsum. Finally, switch to raised bed gardening.
Lab Test
A lab test will give you a specific breakdown of the soil’s exchange capacity(defined below), nutrient levels, organic material levels and pH. If you are trying to find out why you can’t get something to grow, this test will help you immensely. Many university Cooperative Extension Service offices offer professional soil tests (here’s a list by state), but you can also turn to a private company as well. Here are some:
Private Soil Testing Labs
Woods End Soil Labs
290 Belgrade Rd,
Mt Vernon, ME 04352
207-293-2457
A&L Eastern Laboratories
7621 White Pine Road
Richmond, VA 23237
804-743-9401
A & L Western Agricultural Lab
1311 Woodland Ave # 1,
Modesto, CA 95351
(209) 529-4080
A & L Plains Agricultural Laboratories
302, 34th St
Lubbock, TX 79404-2126
806-763-4278
Analyzing Results
- Exchange Capacity – 5 to 40 – measures your soil’s ability to hold nutrients, specifically its ability to hold cation elements (defined below). Higher the better. Sandy soils have a lower exchange capacity than clay soils. Adding organic matter can raise your exchange capacity.
- Soil pH – 0 to 14 – measures the acidity (below 7) or alkalinity (above 7) of your soil. Most plants prefer a pH between 6.0 and 6.5, however every plant is different. (See pH test below for more info.)
- Organic Matter – 0% to 15% – measures the amount of organic material in a soil. In general, the higher the better.
In addition to the characteristics above, the lab soil test will give you a break down of the nutrients in the soil. They present them in three main parts; Anions (An-eye-ons), Cations (Cat-eye-ons) and Minor Elements.
Anions – are negatively charged atoms.
- Sulfur – 0 ppm to 20 ppm (parts per million) – Sulfur is important for the formation of proteins and many other processes. Alliums like onions and garlic and cabbages need more Sulfur than other plants. Sulfur washes away easily, so if you have sandy soil, this may be an issue for you.
- Phosphorus – 0 to 100 lbs per acre of P2O5 – Plants use Phosphorus in large amounts to make sugars. If your fruits aren’t coming out as sweet as they should, you probably need more Phosphorus. It promotes root growth, flowering and setting seed.
Cations – are positively charged atoms. They are also considered bases, basic or alkaline.
Base Saturation – measures the percentage of the Exchange Capacity that is filled by a specific element.
- Calcium Ca++ – 60 to 80% base saturation – Calcium needs to be fill the majority of your Exchange Capacity. Calcium helps your soil remain crumbly and is the primary transporter of minerals, nutrients, and sugars.
- Magnesium Mg++ – 10 to 20% base saturation – Magnesium is in the center of each chlorophyll molecule and as we know chlorophyll is the key to photosynthesis and life on this planet. The ratio of Calcium to Magnesium should be around 7:1.
- Potassium K+ – 2 to 5% base saturation – Potassium encourages lush green grown in your plants. It also helps plants use water and resist drought as it regulates overall plant growth and health. Watch out though, to much will make your plants weak. You don’t need more than 5% base saturation.
- Sodium Na+ – 0.5 to 3% base saturation – Sodium is not necessary for plant growth and high levels of it can be detrimental. Sodium also affects soil structure and permeability.
- Other Bases – 0.5 to 10% – see minor elements below, where they are measured in parts per million.
- Exchangeable Hydrogen H+ – 10 to 15% base saturation – Lower is better. Exchangeable Hydrogen or “reserve acidity” is not a nutrient. It is a measurement of the soil’s ability to trade cation nutrients for hydrogen. When plants and soil micro-organisms take a cation nutrient they replace it with a hydrogen ion. The more exchangeable Hydrogen, the more acidic the soil. If this gets too high, the pH will drop too low and you will need to add lime to bring the pH back up.
Minor Elements – These are called minor, because you need a much smaller amount of them. However, they are still very important and critical for plant health. Deficiencies of these nutrients are less likely when the soil pH is below 6.5.
- Boron B – 0.2 to 5 ppm – Boron is used in conjunction with Calcium. Don’t over apply Boron fertilizers. You can make your soil toxic very easily. You only need a Calcium to Boron ratio of 1000:1. Alfalfa, beets, caneberries, and root crops do well with higher levels of Boron.
- Iron Fe+ – 50 to 200 ppm – Iron makes the leaf darker, increases the thickness and waxy sheen of the leaves, and helps with the maintenance and synthesis of chlorophyll. If the leaves of your acid loving plants are dwarfed and yellowish you may have an Iron or a Manganese deficiency. To correct this, lower the pH of your soil.
- Manganese Mn+ – 25 to 50 ppm – Manganese works hand in hand with Iron and should be at a 1:2 ratio Manganese to Iron. Manganese is an essential part of the development of seeds.
- Copper Cu+ – 0.6 to 6 ppm – Copper works hand in hand with Zinc and should be at a 1:2 ratio Copper to Zinc. Copper helps with plant elasticity, is a component of many proteins, is important for many microbes and helps control molds.
- Zinc Zn+ – 1.5 to 12 ppm – Zinc is an essential component of many enzymes. Too much or too little Zinc will promote weeds. Corn, beans, grapes, hops, onions, and deciduous fruit trees are especially sensitive to low levels of Zinc. Plus it is an essential ingredient to our immune system.
- Aluminum Al+ – less than 2000 ppm – Aluminum is not a plant nutrient, but it can be toxic. Anything less than 2000 ppm is fine.
Improve the Soil by…
- Following the organic fertilizer recommendations provided by the lab.
- Check with the Organic Materials Review Institute (OMRI) to make sure what you are adding is organic.
- Compost is always a good idea. Preferably crushed dried leaf compost, sometimes referred to as leaf mold. Composted manures are also good and contain micro nutrients and nitrogen.
Other Soil Amendments
- Greensand and kelp meal are organic fertilizers that contain micro-nutrients like iron, and potassium.
- Alfalfa meal or alfalfa pellets (found in rabbit food) contain nitrogen, phosphorous and potassium.
- You can also use blood meal to increase nitrogen levels.
- Cottonseed meal can be used to increase the nitrogen in the soil as well, but it will also tend to lower your pH.
- Soybean meal is similar to Cottonseed meal adding nitrogen to the soil.
- Bone meal is recommended to boost phosphorous levels.
- Rock Phosphate is another way to increase your phosphorous levels.
- Wood ash contains potash which will increase your potassium levels.
- Sul-Po-Mag is a naturally-occurring mineral called langbeinite (or sulfate of potash-magnesia). It is water soluble and easy to use. Only use it if you need to add sulfur and/or magnesium as well as potassium.
- Granite dust, Azamite dust, or rock dust is a good way to add trace minerals to your soil. However, they take time to become available to your plants, so this is not a quick fix. I suggest applying some rock dust every three to five years.
- Feather meal is a good source of moderate release nitrogen. Feather meal comes from ground and pelleted chicken feathers. The nitrogen is released into the soil as the soil microbes break down the proteins.
- Fish Emulsion and Fish Meal provide nitrogen and are made from the organic waste of the fish oil industry. The nitrogen from fish fertilizers is available to your plants almost immediately, especially if you use a liquid fertilizer.
- Milorganite breaks down slowly, but contains naturally chelated iron. This means that it is readily absorbed by plants.
- 36% Zinc Sulfate is a good source of zinc. You can also use zinc ligno or amino chelates. Apply 10 lbs per acre to raise zinc levels about 1.8 ppm.
- Manganese Sulfate is 23-27% manganese and is a great way to raise soil levels. Apply 25 lbs per acre to raise levels by about 3.5 ppm.
- 23% Copper Sulfate is a good way to increase your copper levels. Apply 10 lbs per acre to raise soil levels about 0.6 ppm.
- Dolomite can be added to increase magnesium and calcium levels.
- Limestone contains calcium, but will also raise your soil pH.
- Gypsum contains calcium and sulfur. This won’t change your soil pH, since the calcium is balanced by the sulfur. It will also help you if you are having a problem with clay.
pH Test
The pH test allows you to determine the pH or the acidity level of your soil. A lower pH means a more acidic soil. This is important because most of the essential plant nutrients become available to your plants at pH levels of 6.5 to 6.8. In soils with pH levels below 6.0 (acidic) nutrients like nitrogen, phosphorus, and potassium are less available. In soils with pH levels above 7.5 (very alkaline) nutrients like Iron, Manganese, and Phosphorus become chemically bound and are less available.
You can use the pH results from your lab test or you can buy a pH test kit at the store. They are pretty easy to use, just follow the instructions carefully. Remember, this is chemistry, so you have to be as accurate as possible.
Analyzing Results
- pH lower than 5 – your soil is super acidic and needs to be brought up
- pH between 5 and 5.8 – your soil is very acidic. You’ll find that plants like Strawberries and Blueberries do well in this soil.
- pH between 5.5 and 6.8 – your soil is acidic. You’ll find that plants like carrots, corn, garlic, peppers, pumpkins and tomatoes do well in this soil.
- pH between 6.0 and 6.8 – your soil is slightly acidic. You’ll find that plants like asparagus, beets, broccoli, grapes, okra, spinach and peaches do well in this soil.
- pH between 7 and 8 – your soil is very alkaline. You should consider trying to lower your pH. You’ll find that plants like cabbage, cauliflower, celery, cucumbers, olives, pomegranates and thyme do well in this soil.
Improving Your Soil
You cannot change the pH of your soil overnight. This is a gradual process which takes a couple of growing seasons. After you amend the soil, wait a season then test your soil again before adding more amendments. However, you can apply organic matter, which will help moderate pH imbalances.
Raising the pH
If your soil has a pH of below 5 you should try to raise it. Soils in the Eastern US tend to be more acidic. The most common way to increase the pH is to add powdered limestone, which will also add Manganese. Wood ash will also raise the pH, and it contains potassium and other trace elements.
To raise the pH of your soil by about one point:
- Dust your garden with ground limestone. 4 lbs per 100 Sqft of sandy soil; 8 lbs per 100 Sqft of loamy soil; and 10 lbs per 100 Sqft of silty or clay soil.
- Apply no more than 2 lbs per 100 Sqft of wood ash, every two to three years.
Lowering the pH
If your soil is higher than 6.8, you will need to lower your pH. Soils in the western US tend to be more alkaline. The most common way to acidify your soil is to add ground sulfur. You can also add organic materials such as pine needles, cottonseed meal, cocopeat and oak leaves which are naturally acidic.
To lower soil pH by about one point:
- Dust your garden with ground sulfur. 1 lb per 100 Sqft for sandy soil; 1.5 lbs per 100 Sqft of loamy soil; and 2 lbs per 100 Sqft of silty or clay soil.
- You can also add cottonseed meal at a rate of 10 lbs. per 100 square feet.
Feeding the Soil Life & Improving Nutrients
Now that you have tested and amended your soil appropriately, you should have some amazing soil. This should give you great results for a year maybe two, but as time goes on your plants will start to deplete the nutrients in the soil. This is why we have to continually feed the soil.
So the question remains, “What do we feed our soil?” The answer: Organic Material. Life primarily feeds off of life, and soil life primarily feeds off of decaying life. Fallen leafs, coffee grounds, kitchen scraps, and manure are just a few examples. Best thing to do is continually add organic material to your garden in the form of mulch. You can also add compost, compost tea or plant and till in cover crops. I will cover all of this in more detail in future articles.
Action Steps
Now that you know how to make amazing garden soil, I want you to go make some:
- Think of a gardening friend that could learn something from this article.
- Send him or her the link to this article.
- Do the mason jar test and amend your soil appropriately
- Leave a comment below and tell me what your soil type was and what you did to improve it.
For more organic gardening tips and a FREE copy of my book 221 Tips & Tricks from Master Gardeners Illustrated! subscribe here:
References
www.theatlantic.com/health/archive/2013/06/healthy-soil-microbes-healthy-people/276710/
sciencelearn.org.nz/Contexts/Soil-Farming-and-Science/Sci-Media/Images/Relative-size-of-sand-silt-and-clay-particles
www.growinganything.com/what-is-humus.html#sthash.hb1tzGM6.dpuf
sciencelearn.org.nz/Contexts/Soil-Farming-and-Science/Sci-Media/Images/Relative-size-of-sand-silt-and-clay-particles
kdminer.com/main.asp?SectionID=74&SubSectionID=395&ArticleID=43625
Buidling & testing soil
www.weedemandreap.com/get-superpowered-garden-soil/
www.gardeners.com/how-to/building-healthy-soil/5060.html
learn.eartheasy.com/2014/02/5-easy-ways-to-assess-your-soil-for-gardening/
learn.eartheasy.com/2012/01/6-tips-for-building-soil-for-your-raised-garden-beds-and-planters/
www.planetnatural.com/garden-soil/
gardentherapy.ca/soil-food/
Nutrient Amendments
Perlite-homeguides.sfgate.com/use-perlite-amend-clay-soil-74448.html
Gypsum-www.douggreensgarden.com/gypsum-and-clay-soils.html
woodleaffarm.com/enlivening-soil/
www.todayshomeowner.com/guide-to-soil-amendments-for-your-garden/
umaine.edu/gardening/master-gardeners/manual/soils/interpretting-soil-tests/
www.soilminerals.com/soiltest_page1.htm
www.soilminerals.com/information.htm
www.planetnatural.com/garden-soil/
www.todayshomeowner.com/organic-sources-of-potassium-for-your-lawn-or-garden/
www.todayshomeowner.com/how-to-green-up-your-lawn-with-iron-supplement/
www.todayshomeowner.com/organic-sources-of-nitrogen-for-your-lawn-or-garden/
https://www.hunker.com/13406340/what-does-potassium-do-for-plants
https://www.hunker.com/13404735/what-does-phosphorus-do-for-plants
pH
www.gardeningknowhow.com/garden-how-to/soil-fertilizers/cottonseed-meal-fertilizer.htm
www.plantea.com/pH.htm
wholefoodhome.com/how-to-improve-your-garden-soil-without-a-compost-heap-2/


This blog was… how do you say it? Relevant!! Finally I’ve found something which helped me.
Thank you!
Thank You,
I’m glad you got something from it. After you try one of the tests, come back and tell us your results.
Stephen
I was looking up information on using sand in my garden and found a lot of info here that I didn’t know that should be really helpful. I had no idea that there were optimal levels of sand in soil composition for garden use, but I’ll have to keep this in mind. I’m glad the infographics were included since that helps a lot in bringing instructions together for me.
Thanks John, glad you found it helpful. Please share it with a friend.
Wow! Written in laymen’s terms that I can understand and put to good use. Anxious to get out there and test my soil and start amending it. Thanks
Hi Lyne, glad to help. Good luck!
I think it was really interesting that rock particles are a part of your soil recipe. I would never think that any sort of thing as hard as a rock would be in the ideal soil. Honestly, as interesting as the recipe was though, I don’t really have time to make my own soil so I definitely prefer to buy mine.
Ya, I’ve tried buying bagged soil, but it is so hard to figure out what is in them. I found that Mel’s mix brings it back to basics and works the best.
This is helpful information for establishing my new garden in poorly drained silty river valley soils. I’m not certain that adding 1 inch of cocopeat, 4 inches of perlite and 6 inches of compost is practical. I see many productive farms on adjacent fields that do not incorporated perlite and peat. I do see them using raised beds. Would raised beds and compost be enough of an effort without adding perlite and peat? And why tilling? I watch and try to learn from the farmers (many organic) in my area and they don’t seem to be tilling much. The apply the compost to the surface and shallowly tilth it in. Wouldn’t tilling just result in rapid exchange of air and quick burn of the organic matter as alluded above ; “microbes are eating the organic material quickly” ? I’m not sure of the tilling of the “green manure” crop makes sense for the same reason, Why not use spring oats or some cover crop that will die back and not need tilling in the spring? Do raised beds put added pressure on gardeners to water all the time (even in silty or clay soil types)?
I’m just learning and trying to put the pieces together. Thank you for the great write-up.
The short answer to your questions, is yes you are correct. That being said, here is some more detail.
You are right, that amending existing soil is not very practical and you are right that a raised bed could be a better alternative. I have had the most luck with raised beds filled with the perfect soil mix. I suggest Mel’s mix from The Square Foot Gardener (1 part peat moss/cocopeat, 1 part compost, and 1 part perlite/vermiculite. I suggest perlite over vermiculite because in some rare cases vermiculite contains asbestos). I tried just compost and it wouldn’t drain properly. I’ve also tried just compost and peat, which drained better, but still not well enough. That being said, I’ve been leaving out the perlite and adding an AB fill mixed with composted horse manure to help with drainage instead. So far I haven’t had any problems with compacted soil or drainage.
Deciding between amending your existing soil and building raised beds is situational based on each gardener’s/farmer’s needs. Improving existing soil by adding inches of amendments is not easy, but neither is setting up raised beds. It will depend on how much you plan on growing and what sort of area you are thinking about growing in. For most people, I suggest starting off small with one or two raised beds and during the slow months in winter adding one or two additional beds each year.
You are right that in general tilling is something that you want to avoid. It damages the soil structure and fungal organisms in the soil as well as kills worms and other beneficial micro-organisms. As you said it also allows nitrogen to escape the soil. However, when you first add your amendments, you are going to want to mix them in. You can do that manually with a shovel, or with a mechanical till.
As far as green manure goes, yes there are many options, some of which do not require tilling. I do not think that you will have any negative effects from breaking down the organic material too quickly. Really, that is what you want, so that the microbes make those nutrients available for the next crop as soon as possible. Springs oats or the like, that are allowed to die on there own do not require tilling. This is preferred in some cases. The dead plant material turns into mulch which protects the soil and slowly breaks down into food for the next crop. Both techniques have there uses depending on your goals. I do suggest that you do not till more than once a year if at all. I do not till my raised beds. Instead, I pull everything at the end of the season and compost it. Then before I plant the next crop, I refill the bed with a layer of compost.
Raise beds filled with the proper soil are very water efficient. I grow in the hot and dry Arizona desert and I only have to water every other day. The key is the peat moss/cocopeat and the compost, both act like a sponge and hold moisture really well. While at the same time drain well. It is kind of magical.
I like that you are watching the farmers in your area. I highly suggest you talk to them further to find out what they have found to be the most successful for them. No sense in re-inventing the wheel through trial and error, when they have already done the experiments and can share their results with you.
Let me know if you have any more questions and remember, stay strong, keep growing. Let’s grow together. Steve
hi, I find your article extremely helpful, and I am always looking for simple and informative organic gardening tips like this and this is the best I have found on this topic. I would love to print it out and hand it out to my gardening class with your permission?
Yes you may. Glad you enjoyed it.
Thanks for sharing blog post, it helps a lot!
Wow….an eye opener and good tips….after a loooong hunt. I will know more tomorrow, but my mason jar is leading me to believe 0% sand, 95% silt………can’t tell any clay yet.
Hi Terry, good luck!