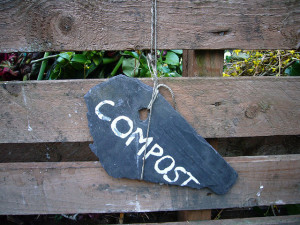
 What if I told you that their was an amazing garden soil amendment that could boost your production, improve your plant’s health, increase your drainage, and at the same time help with moisture retention? And to top it off, this magic amendment is organic. Unbelievable, right? Well it’s true. Compost can do all of that and more. The best part is that you can make your own compost for free.
Here are some things that compost can do for you:
- Compost improves garden soil structure, texture and aeration.
- Compost will help sandy soils retain moisture
- Compost will help loosen clay soils
- Compost stimulates healthy root development in plants.
- Compost is an organic fertilizer and a source of balanced nutrition for your plants.
- The organic matter provided in compost provides food for microorganisms, which keeps the soil in a healthy, balanced condition.
- Compost aids in pest and disease management.
- Compost moderates the soil PH
- Composting can divert as much as 30% of household waste away from the land fill.
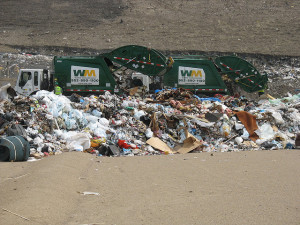 The average household throws away about two pounds of organic waste a day. This adds up to millions of tons of organic waste per year, most of which is transported to landfills. By throwing away compostable materials we are not only filling up our landfills, we are also discarding a valuable resource that can help your plants grow.
Compost stimulates beneficial organisms. Compost is teeming with all kinds of microorganisms and soil fauna that help convert soil nutrients into a form that can be readily absorbed by your plants. The microorganisms, enzymes, vitamins and natural antibiotics that are present in compost actually help prevent many soil born diseases from harming your plants. Also, earthworms, millipedes, and other macro-organisms tunnel through your soil, opening up passageways for air and water to reach your plants’ roots.
What are we learning?
In this article we are continuing to address the question of, “What do you feed your soil?” to keep your garden soil amazing and grow productive plants. As we discussed in my last article, organic material is the best thing to feed your soil. We also discussed that mulching with compost is the best way to do this. This leads us to another great question:
How do I make nutritious compost?
Composting is the act of breaking down organic material. Compost is basically the left overs and waste products from millions of micro-organisms. There are three main ways to compost:
- Traditional Composting (aerobic) – in this process we keep our raw organic waste outdoors on the ground and allow air and water into the mix.
- Bokashi Composting (an-aerobic) – in this process we keep our raw organic waste in a closed container and add a starter powder containing an-aerobic bacteria.
- Worm Bins (vermiccomposting) – in this process we feed our raw organic waste to specialized worms in a bin inside the house.
Each technique has it’s place. In the next few articles, I’ll go through each so you can decide which is best for your situation. First, I will use the rest of this article to discuss traditional composting. Then for the other types follow the links above (to follow).
Traditional Composting
Traditional composting is done through the work of microorganisms, soil fauna, enzymes and fungi. Those little critters will basically eat all of your raw ingredients and create compost for you. Your job is to provide the best possible environment for these beneficial organisms to do their work.
This technique might work best for you if you…
- have a yard with at least a 5ft by 5ft area of available space for composting.
- have a garden with some waste coming out of it. (expired plants, fall leaves, grass clippings, etc.)
Basic Components of Compost
Compost starts with raw carbon rich organic material. In order to break it down into compost you need micro organisms like bacteria and fungus. Don’t worry though, these organisms are all around you and in your soil already. Then you need to support those organisms with Oxygen, Nitrogen, and water. You’ll get the Oxygen from the air and the Nitrogen from green waste and the air. Lastly, you need to give micro organisms some time to do their job.
The trick to making an abundance of compost in a short time is to balance the following four things:
 Oxygen. To do their work most efficiently, microorganisms require a lot of oxygen. When your pile is first assembled, there will probably be plenty of air between the layers of materials. But as the microorganisms begin to work, they will start consuming oxygen. Unless you turn your pile or in some way aerate it, they will run out of oxygen and slow down or stop working.
 Water. Moisture is very important for the composting process. Too much moisture will drown the microorganisms, and too little will dehydrate them. You want to keep the material in your compost pile as moist as a well-wrung out sponge or around a 40%-60% moisture level. If you need to add water, insert your garden hose into the middle of the pile in several places, or sprinkle the pile with water when you turn it. Unchlorinated water is best. If you need to you can fill up a 5 gallon bucket with chlorinated water and let it sit out for 24 hours to allow the chlorine to evaporate out. Then add it to your compost slowly. You can cover your compost or keep it in an enclosed container to help it retain its moisture, but you have to be careful not to choke off the oxygen.
 Browns. Carbon-rich materials are the energy food for microorganisms. You can identify high-carbon plant materials because they are dry, tough, or fibrous, and tan or brown in color. Some examples include dry leaves, straw, rotted hay, sawdust, shredded paper, and cornstalks.
Greens. High-nitrogen materials provide the protein-rich components that microorganisms require to grow and multiply. Spent coffee grounds, freshly pulled weeds (without seeds), fresh grass clippings, over-ripe fruits and vegetables, kitchen scraps and other moist green matter are the sorts of nitrogen-rich materials you’ll probably have on hand. Other high-protein organic matter includes kelp meal, seaweed, chicken manure, cow manure, horse manure and animal by-products like blood or bone meal.
The Balance
The ratio of Browns to Greens should be 25 to 30 parts Browns to 1 part Greens by weight. Alternatively you can use about 4 times as much Browns as Greens by volume.
If you add too much nitrogen rich Greens, the decomposers will work too fast, using all of the available oxygen. Then anaerobic bacteria will take over and produce bad smells as well as acids and alcohols that are toxic to growing plants.
Not all Organic Materials Are Equal
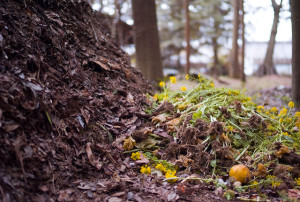
Leaves are the most important part of a compost pile. In fact, leaves are the part of the pile that becomes the finished compost. Kitchen scraps, spent garden plants and such are simply food for the organisms that will turn those mineral and nutrient rich leaves into garden gold!
Remember: These precious ingredients only fall once a year, so you will need to stockpile for year-long mulching and compost mixing. Also the leaves need to be shredded; whole leaves make a terrible mulch, and resist composting. My favorite way to shred leaves is with a leaf ‘blower/vac’ on its reverse setting. The built-in shredder will reduce the volume by at least a factor of ten, allowing you to store lots of leaves for future mulching and compost making.
Here is a list of other materials you can use to make your compost.
|
Material |
Category |
Notes |
| dry leaves |
Brown |
leaves break down faster when shredded |
|
moldy bread |
Brown |
Mix in with other kitchen scraps |
|
stale cereals |
Brown |
Mix in with other kitchen scraps |
|
nut shells |
Brown |
Mix in with other kitchen scraps |
|
peat moss |
Brown |
Be careful no to use to much, it is highly acidic. |
|
expired garden plants |
Green or Brown |
use disease-free plants only |
|
shrub prunings |
Brown |
woody prunings are slow to break down |
|
straw or hay |
Brown |
straw is best; hay (with seeds) is less ideal |
|
pine needles |
Brown |
acidic; use in moderate amounts |
|
newspaper |
Brown |
avoid using glossy paper and colored inks |
|
shredded paper |
Brown |
avoid using glossy paper and colored inks |
|
cardboard |
Brown |
shred material to avoid matting |
|
corn cobs & stalks |
Brown |
slow to decompose; best if chopped up |
|
dryer lint |
Brown |
best if from natural fibers, avoid lint from synthetic materials |
|
sawdust |
Brown |
high carbon levels; add in layers to avoid clumping, avoid saw dust with machine oils on it |
|
wood chips / pellets |
Brown |
high carbon levels; use sparingly |
|
alfalfa |
Green |
Good source of nitrogen |
|
algea |
Green & Minerals |
Good source of nitrogen and micro nutrients |
|
clover |
Green |
Good source of nitrogen |
|
green leaves |
Green |
Good source of nitrogen and nutrients |
| spent hops |
Green |
Good source of nitrogen |
| cottenseed meal |
Green |
Good source of nitrogen |
| table scraps |
Green |
add with dry carbon items |
| fruit & vegetable scraps |
Green |
add with dry carbon items, may contain pesticide/herbicide residues |
| orange rinds |
Green |
add with dry carbon items, may contain pesticide/herbicide residues |
| grass clippings |
Green |
add in thin layers so they don’t mat into clumps. However, I prefer to leave these in the lawn to fertilize the lawn. |
| lawn & garden weeds |
Green |
only use weeds which have not gone to seed |
|
green comfrey leaves |
Green |
excellent compost ‘activator’ |
|
animal manures |
Green |
Great source of nitrogen to get boost your pile |
|
coffee grounds |
Green |
filters may also be included. With dried shredded leave and coffee grounds alone, one can make an amazing compost. |
|
tea leaves/bags |
Green |
loose or in bags |
|
flowers & cuttings |
Green |
chop up any long woody stems |
|
seaweed and kelp |
Green |
apply in thin layers; good source for trace minerals |
|
bone meal |
Green & Mineral |
Good source of nitrogen and micro nutrients |
|
fish parts |
Green & Mineral |
Good source of nitrogen and micro nutrients, may attract pests |
|
eggshells |
Mineral |
best when crushed up, add calcium and potassium |
|
rock dust |
Mineral |
micro nutrients, breaks down and becomes available to plants slowly. Acts like time release |
|
dandilions |
Green & Mineral |
micro nutrients – naturally pulls nutrients from deep in the soil and brings them to the surface |
|
banannas |
Mineral |
Good source of potassium, may contain pesticide/herbicide residues |
|
wood ash |
Mineral |
only use ash from clean materials; sprinkle lightly |
Other Tips on Materials
For kitchen wastes, keep a container with a lid. When the container is full, take it out to your compost pile and rotate it in.
wood ash – introduces pot-ash which contains potassium. Becareful though, this will also make your compost more alkaline and could slow the break down process.
Fish bones, heads, scales, etc. Introduces nitrogen, carbon, calcium, potassium, manganese, magnesium and chitin into the soil. Chop up large heads and allow large fish bones to dry out before crushing into small pieces. Be aware that fish parts may attract pests and vermin.
Bone meal. This comes from larger meat animals. You need to dry out the bones and crush them finely to make them beneficial to your compost. Bone meal introduces nitrogen, carbon, calcium, potassium and trace minerals needed by the soil.
Leaves must be shredded, or they will matt together and prevent the pile from breaking down efficiently. If you are not willing to shred up lots of leaves, use a worm bin instead. Those worms will gladly devour your scraps and give you high quality compost in return.
The finer chopped up the raw ingredients are the quicker they will compost down.
Sawdust may be added to the compost, but should be mixed or scattered thinly to avoid clumping. Be sure sawdust is clean, with no machine oil or chain oil residues from cutting equipment.
You can also add a bit of garden soil to your compost. A layer of soil will help to mask any odors, and the micro-organisms in the soil will accelerate the composting process.
Do Not Use
Meat eating pet waste, coal ash, invasive weeds and grasses, weed seeds, pesticides, herbicides, chemical fertilizers, fats, meats, butter, oil, colored paper, waxy magazine paper, plastic, synthetic materials, glass, metal, black walnut leaves or plants that regrow from their parts.
Black walnut leaves in bulk should not be composted. They contain a substance called juglone that inhibits the growth of plants. If you get a couple leaves in a mix of leaves it should not hurt anything. It only becomes a problem if you use a lot of leaves.
Mixed schools of thought
Some people think that the compost pile will neutralize any diseases introduced to it and actually make the plants that use the compost more resistant to the disease. Sort of like a vaccine.
Others believe that this will just spread the disease around and that any and all diseased plant material should be thrown in the trash immediately.
I say that it will depend on how well your compost breaks down material. If you have a really good pile that heats up nicely and breaks down materials well, you will probably be OK with diseased plant material as well as invasive plants, grasses and weed seeds. However, if you are unsure about how well your compost pile is working, I would just throw away diseased plants, weeds, and invasive plants and grasses. Its not worth taking the risk.
Sample Compost Recipes
If you just pile up kitchen garbage, you’ll end up with a pile of kitchen garbage. You need at least four parts well-shredded leaves by volume to each part green waste to get good compost.
Recipe 1
4 part dry leaves
1 part chicken or horse manuer, fresh grass clippings, or coffee grounds.
1 part good garden soil
Spread the ingredients in 3 to 4 inch deep layers to a height of 3 to 4 feet.
Add water as needed.
Recipe 2
3 parts straw or spoiled hay
1 part chicken or horse manuer, fresh grass clippings, or coffee grounds.
1 part good garden soil
Spread ingredients in 3 to 4 inch deep layers to a height of 3 to 4 feet.
Add water as needed.
*You can add kitchen and garden waste to either of these piles.
*The finer chopped up the raw ingredients are, the quicker they will break down.
Composting Throughout the Seasons
This list gives you an idea of what you should be composting throughout the year.
Fall – leaves, kitchen scraps, animal bedding and manures*
Winter – shredded branches and finished annuals like peppers and tomatoes, kitchen scraps. If it gets too cold outside in winter consider a worm bin for your kitchen scraps. If you get a lot of rain you may want to cover your pile, so it does not get too soggy.
Spring – prunings, kitchen scraps, animal bedding and manuers
Summer – prunings, kitchen scraps
*animal bedding and manuers – you should only clean out your livestock pens twice a year.
Getting Your Compost Started
Selecting a Site
You can’t just put your compost where ever you like. Here are some things to consider when selecting a site:
- You want your compost close to your kitchen and your garden, but not too close. Sometimes it can get to smelling, especially if your like me and neglect your pile every once and a while.
- You also want it close to your livestock pens, so it is easy to throw their bedding into your compost pile.
- If possible select a site that has a good breeze. The pile will be using up the oxygen in the area and letting off some smells, so good airflow will help the piles breath.
- You want to have access to water, especially if you live in a dry climate. You’ll need to be adding moisture to your pile frequently. If you are in a rainy area, you may want to cover your compost so that it doesn’t get too wet and soggy.
- You’ll want to find a spot that gets full sun in the winter and some shade in the summer.
- Make sure your site has enough space for multiple piles. At least two, one pile that you are actively adding to and one pile that is finishing. Depending on your volume, you may want a couple more piles that are finishing.
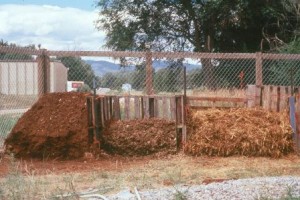
Building your compost bin
Composting systems can get as complicated as you want, but I like to keep mine simple. Review the following techniques and pick one that works for you.
Piles
 This is the system that I use. In this system you simply gather up your debris into piles about 3 or 4 feet high.
Benefits: no start up costs, can access all sides for turning, start as many piles as you need, good for high volume composting.
Cons: compost tends to “escape”, conical pile is hard to manage.
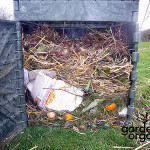
Pallet, Framed or Brick Bins

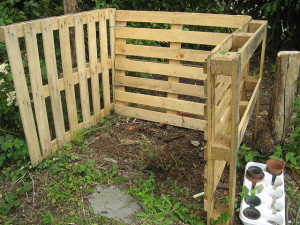 You can build 3 or 4 ft square bins either out of pallets, 2×4’s and hardware cloth, bricks or stone. When building your bins it is important to leave holes in the sides to allow air into your compost. You also want to leave the front of your bins open or put doors on them, so you can access the compost easily.
You can build as many bins as you like. It is suggested to build at least 3 and have them side by side for efficiency. Having several bins allows you to use one section for storing materials, one for active composting, and one for curing or storing finished compost. Also, do not put a floor on your bins, so that worms can access your compost.
Benefits: easy to turn from one bin into the next for aeration, contained, attractive, good for medium to high volume composting.
Cons: start up costs, less airflow.
Wire Cage
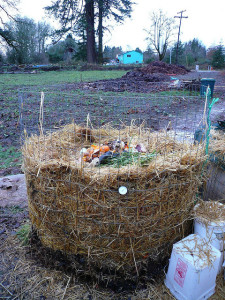 You can make a cylinder out of some medium-gauge hardware cloth or fencing. Make sure your cylinder is not smaller that 3 ft diameter. In order to achieve that, you need at least 10 linear feet of hardware cloth or fencing. Also make sure your cylinder is at least 3 ft high. You can make your bin larger, but if do, consider putting a small 1 ft diameter cylinder of hardware cloth in the center to help get more air into your pile.
Benefits: cheap to set up, contained, set it and forget it, great for large amounts of fall leaves.
Cons: not easy to rotate, takes longer to break down, may need to stake down fencing.
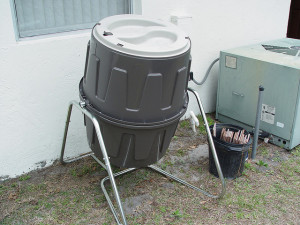
Stationary Plastic Bins
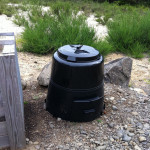
 These bins are for continuous rather than batch composting. You simply add your material to the top and open a door at the bottom to access the finished material. Most units are made from recycled plastics. They have air vents along the sides, but airflow is usually a problem for these bins.
Benefits: easy to set up, contained, no rotation required, set it and forget it, attractive.
Cons: have to buy the bin, takes longer to break down, not good for high volume, airflow is low, may smell more.
Trash Can Bin
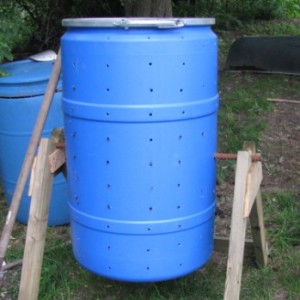 To convert a plastic trash can into a composter, cut off the bottom with a saw. Drill quarter-inch holes in the sides of the can every 3 to 6 inches for good aeration. Bury the bottom of the can from several inches to a foot or more below the soil surface and press the loosened soil around the sides to secure it. Partially burying the composter will make it easier for microorganisms to enter the pile.
Benefits: trash cans are cheap, contained, no rotation required, set it and forget it.
Cons: drilling and digging can be a pain, takes longer to break down, not good for high volume, hard to access finished compost without pulling can out of ground.
Rotating Bins
 These composters are for making small batches of compost. Fill the bin, then load it up and rotate it often. If materials are shredded and you have the right ratio you can have finished compost in five weeks or less. The key is to make sure you get air into the bin.
Benefits: contained, quick results.
Cons: not good for high volume, small batches, difficult to get proper airflow.
Adding Your Raw Organic Materials
- Start your compost pile on bare earth. This allows worms and other beneficial organisms to aerate the compost and help brake it down.
- Lay twigs or straw first, a few inches deep. This aids drainage and helps aerate the pile.
- Add compost materials in layers, alternating Browns and Greens as discussed earlier. If you have wood ashes or saw dust, sprinkle in thin layers, or they will clump together.
- Optionally add a compost activator, starter or accelerate into the layers as you go.
Maintaining Your Compost
After you have got your compost started you need to maintain it. Do the following to ensure your composting is successful.
- Keep compost moist. Water occasionally, or let rain do the job.
- Only cover your compost if you are getting too much rain and your pile is getting soggy.
- Turn your pile with a pitchfork or shovel every week to give your pile the Oxygen it needs to break down. You can skip this step if you are patient. It just takes your pile longer to break down if you do not rotate it.
- Once your compost pile is established, add new materials by mixing them in. I try to rotate my pile each time I add material to it.
Aeration – To Turn or Not to Turn?
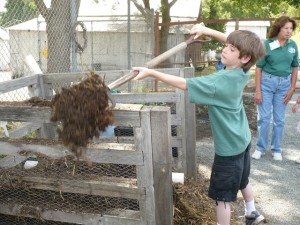 Remember that one of the main components of composting is Oxygen. The way most people get oxygen into the pile is by turning it. Turning your compost is a process of fluffing it up to get air into the mixture. For fastest results, turn your compost every 3 to 5 days or weekly.
One problem with turning, is that each time you turn it, you release some of the nitrogen into the air. However, the benefits are that the pile gets well mixed, the micro-organisms get the oxygen they need and the pile usually breaks down quicker.
My pile is about 1 or 2 ft thick and I literally turn it over one shovel full at a time, moving it to the side one shovel width each time I turn it. I do this every time I bring out my kitchen scraps bucket, which is full of things like coffee grounds, egg shells and vegetable matter. I do this about once a month. I live in the desert, so I also water my pile when I rotate it.
You can also get a Compost Aerator. These tools allow you to fluff up your pile in place by stabbing it and turning it with this nifty tool. You can also try a pitch fork.
“No-turn” Composting
The biggest chore with composting is turning the pile from time to time. However, with ‘No-turn Composting’, your compost can be aerated without turning.
The secret is to thoroughly mix in enough coarse material, like straw, when building the pile. The compost will develop as fast as if it were turned regularly, and studies show that the nitrogen level may be even higher than with turned compost.
With ‘no-turn’ composting, add new materials to the top of the pile, and harvest fresh compost from the bottom of the bin. This can be easily done in an Aerobin Composter, or a WIBO compost bin.
Here are a few ways to keep your pile aerated, without the hassle of turning:
- Make sure there are air vents in the sides of your compost bin.
- Put one or two perforated 4″ plastic pipes in the center of your pile.
- Build your pile on a pile of branches. Then, just shake the branches a little instead of turning your pile
Compost Likes it Hot Hot Hot
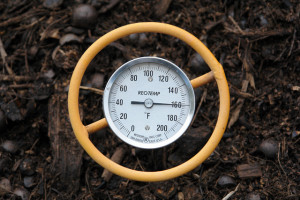 If you built your pile correctly the internal temperature should be 140 F or higher. Heat is a by-product of intense microbial activity. It indicates that the microorganisms are breaking down the organic matter and converting it into compost. The temperature of your compost pile does not in itself affect the speed or efficiency of the decomposition process. But temperature does determine what types of microbes are active.
There are primarily three types of microbes that work to digest the materials in a compost pile. They each work best in a particular temperature range:
The psychrophiles work in cool temperatures—even as low as 28 degrees F. As they begin to digest some of the carbon-rich materials, they give off heat, which causes the temperature in the pile to rise. When the pile warms to 60 to 70 degrees F, mesophilic bacteria take over. They are responsible for the majority of the decomposition work. If the mesophiles have enough carbon, nitrogen, air, and water, they work so hard that they raise the temperature in the pile to about 100 degrees F. At this point, thermophilic bacteria kick in. It is these bacteria that can raise the temperature high enough to sterilize the compost and kill disease-causing organisms and weed seeds. Three to five days of 155 degrees F. is enough for the thermophiles to do their best work.
Getting your compost pile “hot” (140 to 160 degrees F.) is not critical, but it does mean that your compost will be finished and usable within a month or so. These high temperatures also kill most weed seeds, as well as harmful pathogens that can cause disease problems. Most people don’t bother charting the temperature curve in their compost pile. They just try to get a good ratio of carbon to nitrogen, keep the pile moist and well aerated, and wait until everything looks pretty well broken down.
Commercial activators can help raise the temperature in your compost pile by providing a concentrated dose of microorganisms and protein. Other effective activators that can help to get your pile hot include humus-rich soil, rotted manure, finished compost, dried blood, and alfalfa meal.
Compost Tea
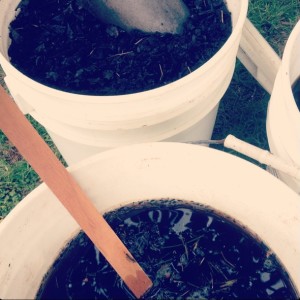 Making your own compost tea provides you with a chemical-free way to boost plant growth. It also provides nutrients for the soil and helps suppress many plant diseases. Plants thrive from all the nutrients found in compost tea and it is so easy to make.
Leaf-mould tea
You can also use leaves to make a nutritious “tea” for your plants. Simply wrap a small pile of leaves in burlap and immerse in a garbage can or large bucket of water. Leave for three days, then remove the “tea bag” and dump contents into the compost. Scoop out the enriched water with a smaller bucket and use to water your plants and shrubs.
Brewing Compost Tea
- Use a clean 5 gallon bucket and fill it ⅓ of the way full of finished compost.
- Fill the bucket to the top with fresh water that is un-chlorinated. If you have to use water that is chlorinated, then fill a bucket up with water the night before and let it set for 24 hours before adding it. This will give the chlorine time to evaporate.
- Let your compost and water mixture steep for 3 to 4 days.
- Be sure to stir it every now and then. I stir mine once in the morning before I head to work and once when I get back home.
- Once the tea has fully steep, it is now ready to be drained. Tie an old shirt or a piece of burlap over a second 5 gallon bucket to create a “filter”. Slowly pour your compost tea mixture into the second bucket through the “filter”.
- You may need to scrape off some sludge now and then to allow the tea mixture to flow into the second bucket. Any solids left in your first bucket can be dumped back into your compost pile.
- Remove the material filter and check out your compost tea.
The finished result is a potent version of tea that you can use on your mature plants. However, I still dilute it 50/50. If you would like to use it on your baby plants mix the potent tea with water at a ratio of 1:10. In other words, add 1 cup of compost tea to 10 cups of water before giving it to your young plants.
Option 1: Improve your compost tea by adding oxygen to the mix. I’ve even seen fancy compost tea buckets equipped with a small aquarium pump to aerate the mixture. If you want to go this route, use 1 aquarium pump, 1 gang valve, and 3 feet of aquarium hose. You can attach 1-foot of hose to each valve and hang the hose down into the side of the bucket before adding in the water. The aquarium pump will provide more air to the mixture, but you still have to stir it.
Option 2: You can boost your compost tea by adding some fish emulsion to it before applying it to your plants.
Go Get Started!
Start saving your kitchen waste in a bucket with a lid today. Then, find a spot in your yard and start a compost pile. If you don’t have any leaves, buy a bail of straw to get yourself started. Add your ingredients in layers with some soil and soon you will have your own black gold.
For more organic gardening tips and a FREE copy of my book 221 Tips & Tricks from Master Gardeners Illustrated! subscribe here:
Composting Tips
1.) Help start a new compost pile with blood meal, cottonseed meal, well-aged manure or compost starter. They are rich in nitrogen and help “fire-up” the microbes responsible for breaking down organic matter into compost.
2.) Chop or shred materials before putting them in the compost pile or bin. The smaller it is, the faster it will break down.
3.) Use a kitchen compost pail or crock for storing food scraps. It will reduce the number of trips you make to the compost pile.
4.) Plants that have been treated with pesticides and/or herbicides (weeds and lawn clippings) should be avoided.
5.) Add a lot to your pile at once, rather than in small doses to encourage the pile to heat up.
6.) Turn, turn, turn. Turning compost will introduce oxygen and speed up the composting process.
7.) Keep your pile or bin in the sun. Microbes are more active when warm.
8.) Activators can get a slow compost heap sped up.
9.) When compost is finished it should look, feel and smell like rich, dark soil. You should not be able to recognize any of the items you put in there.
10.) Finished compost is usually less than half the volume of the materials you started with, but it’s much denser.
11.) Apply finished compost to your garden about 2-4 weeks before you plant, giving the compost time to integrate and stabilize within the soil.
12.) The soil beneath a compost bin becomes enriched as nutrients that filter down with successive waterings and worms that live beneath your pile. You can take advatage of this by putting your pile under a fruit tree or over a future garden bed.
13.) Compost should be used as a soil amendment, and not as a growing medium. Best mix is 1/3 compost, 1/3 perlite, and 1/3 peat moss.
14.) Take advantage of autumn’s bounty by gathering all of the fall leaves you can from your yard, other people’s yards, or local parks. You will need this reserve of Browns to balance the regular input of nitrogen-rich materials which come from kitchen scraps, fruit and vegetable peelings, and coffee grounds from your house.
15.) Fresh grass clippings are nitrogen rich and serve as compost activators. Add grass clippings to your compost in thin layers to prevent matting. Then add 3 or 4 times the volume in brown materials to balance the carbon-nitrogen ratio. I personally leave my grass clippings in the lawn to help fertilize the lawn. I have enough livestock bedding and manuer to activate my piles.
16.) Annuals from your vegetable garden which have finished fruiting and are now dying back can be composting. It’s ussually a good idea to shred up larger plants like tomatoes to make it easier to turn your compost. Thick stems and branches should be left out of the compost as they take longer to break down. Flowers also contain many nutrients that are ideal for composting. You can also compost prunings from your perennials.
17.) Store extra material for future composting. After you rescue all of those Fall leaves store them next to the compost bin. As you add kitchen scraps and other Greens, add a layer of leaves on top. This helps balance the compost, keep the smell down and reduce pest problems.
18.) If you have a wood-burning stove, save the ashes and add them to the compost. Use only ash from clean materials and sprinkle onto compost to avoid clumping. Don’t add more than 1 parts ash for 10 parts compost or you will make your pile too alkaline. If the pile has the proper Brown/Green ratio the pH should balance out, even with a little ashes.
Composting FAQ
Q: What does “activate your compost” mean?
A: ‘Activators’ can be added to your compost to help kick-start the process and speed up composting. Common compost activator materials are: comfrey leaves, grass clippings, young weeds, well-rotted chicken manure.
Q: How do I keep flies away from my compost?
A: Small fruit flies, especially, are naturally attracted to the compost pile. They can be discouraged by covering any exposed fruit or vegetable matter.
Q: Why does my compost pile stink?
A: This can be a concern in urban and suburban areas with small lots and neighbors living close by. Odors can be reduced, or eliminated, by following two practices: turn in or cover new additions to the compost pile. Your pile may be too wet. Allow it to dry out some. Your pile may not contain enough Browns. Turn in some Browns to help neutralize the smell.
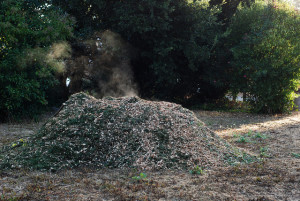 Q: My compost pile is steaming, is that bad?
A: No problem. A hot, steamy pile means that you have a large community of microscopic critters working away at making compost.
Q: My compost pile is soggy, is that bad? How do I fix it?
A: This is a common problem especially in winter when carbon-based materials are in short supply. You can restore your compost to a healthy nitrogen-carbon balance by adding some leaves, straw or other Brown from the list above. You may also concider covering your pile. It may be getting too much rain.
Q: How do I stop my leaves from matting together and my grass clippings from clumping together?
A: The best way to handle this problem it to go back in time and shred the leaves before adding them to the compost. After the fact, you can just do your best to mix and break up the clumps. Eventually they will break down. The same goes for clumpy grass clippings. Bust them up when you rotate your compost and try to add them already mixed to prevent clumping in the future.
 Q: How do I keep raccoons or other vermin out of my compost?
A: Raccoons and vermin will be naturally attracted to your compost pile. The best solution to this problem is to bar their entry to the compost. A wood or metal lid can be easily hinged to the bin or you can buy a commercially-made compost bin with secure fitted lids which are pest-proof, such as the Aerobin, UCT-9 or Jora JK270.
Q: Nothing is happening in my bin, what do I do?
A: First, composting takes time. If you haven’t waited at least a month, be patient. Second, make sure your composting material has the right balance of Browns & Greens. Then make sure it has the right moisture level and is getting some air. If that doesn’t work, try purchasing a commercial compost starter mix, to make sure you have the proper micro-oganisms present.
Q: Where can I get rid of my woody yard waste – shrub and tree trimmings, etc.?
A: The ideal thing to do is shred them up and use them as mulch for walk ways in your garden or landscaping. You can also compost it if it is shredded small enough. Fruit tree wood makes great smoked meats. You can also call your local municipality to see if they have a green waste program.
Q: How do I know if my compost is ready?
A: The simplest way to test your compost’s readiness is to use the bag test, which involves putting a handful of compost in a sealable bag and checking it after a week. If the contents of the bag smell like ammonia or smell sour, then the microorganisms are still working and the compost needs more time.
References
Making Compost
http://www.planetnatural.com/composting-101/how-it-works/
http://www.planetnatural.com/composting-101/what-to-use/
http://www.gardensalive.com/product/compost-
http://articles.mercola.com/sites/articles/archive/2015/07/26/soil-remineralization.aspx
Soil Food for Greener Gardens: Find the Best Amendments in Your Own Backyard
http://www.gardeners.com/how-to/all-about-composting/5061.html?SC=XNET9464
Composting: Everything You Wanted To Know (But Didn’t Want To Ask)
http://www.cityfarmer.org/hotline73.html
http://www.queensbotanical.org/Education/compost/composting101
http://eartheasy.com/article_autumn_composting_tips.html
http://eartheasy.com/grow_compost.html
Making Compost Tea

